LEGO 31130-A Creator Sunken Treasure Mission 

LEGO Audio & Braille Building Instructions for the LEGO Creator set "Creator Sunken Treasure Mission" – octopus with sunken treasure and submarine.

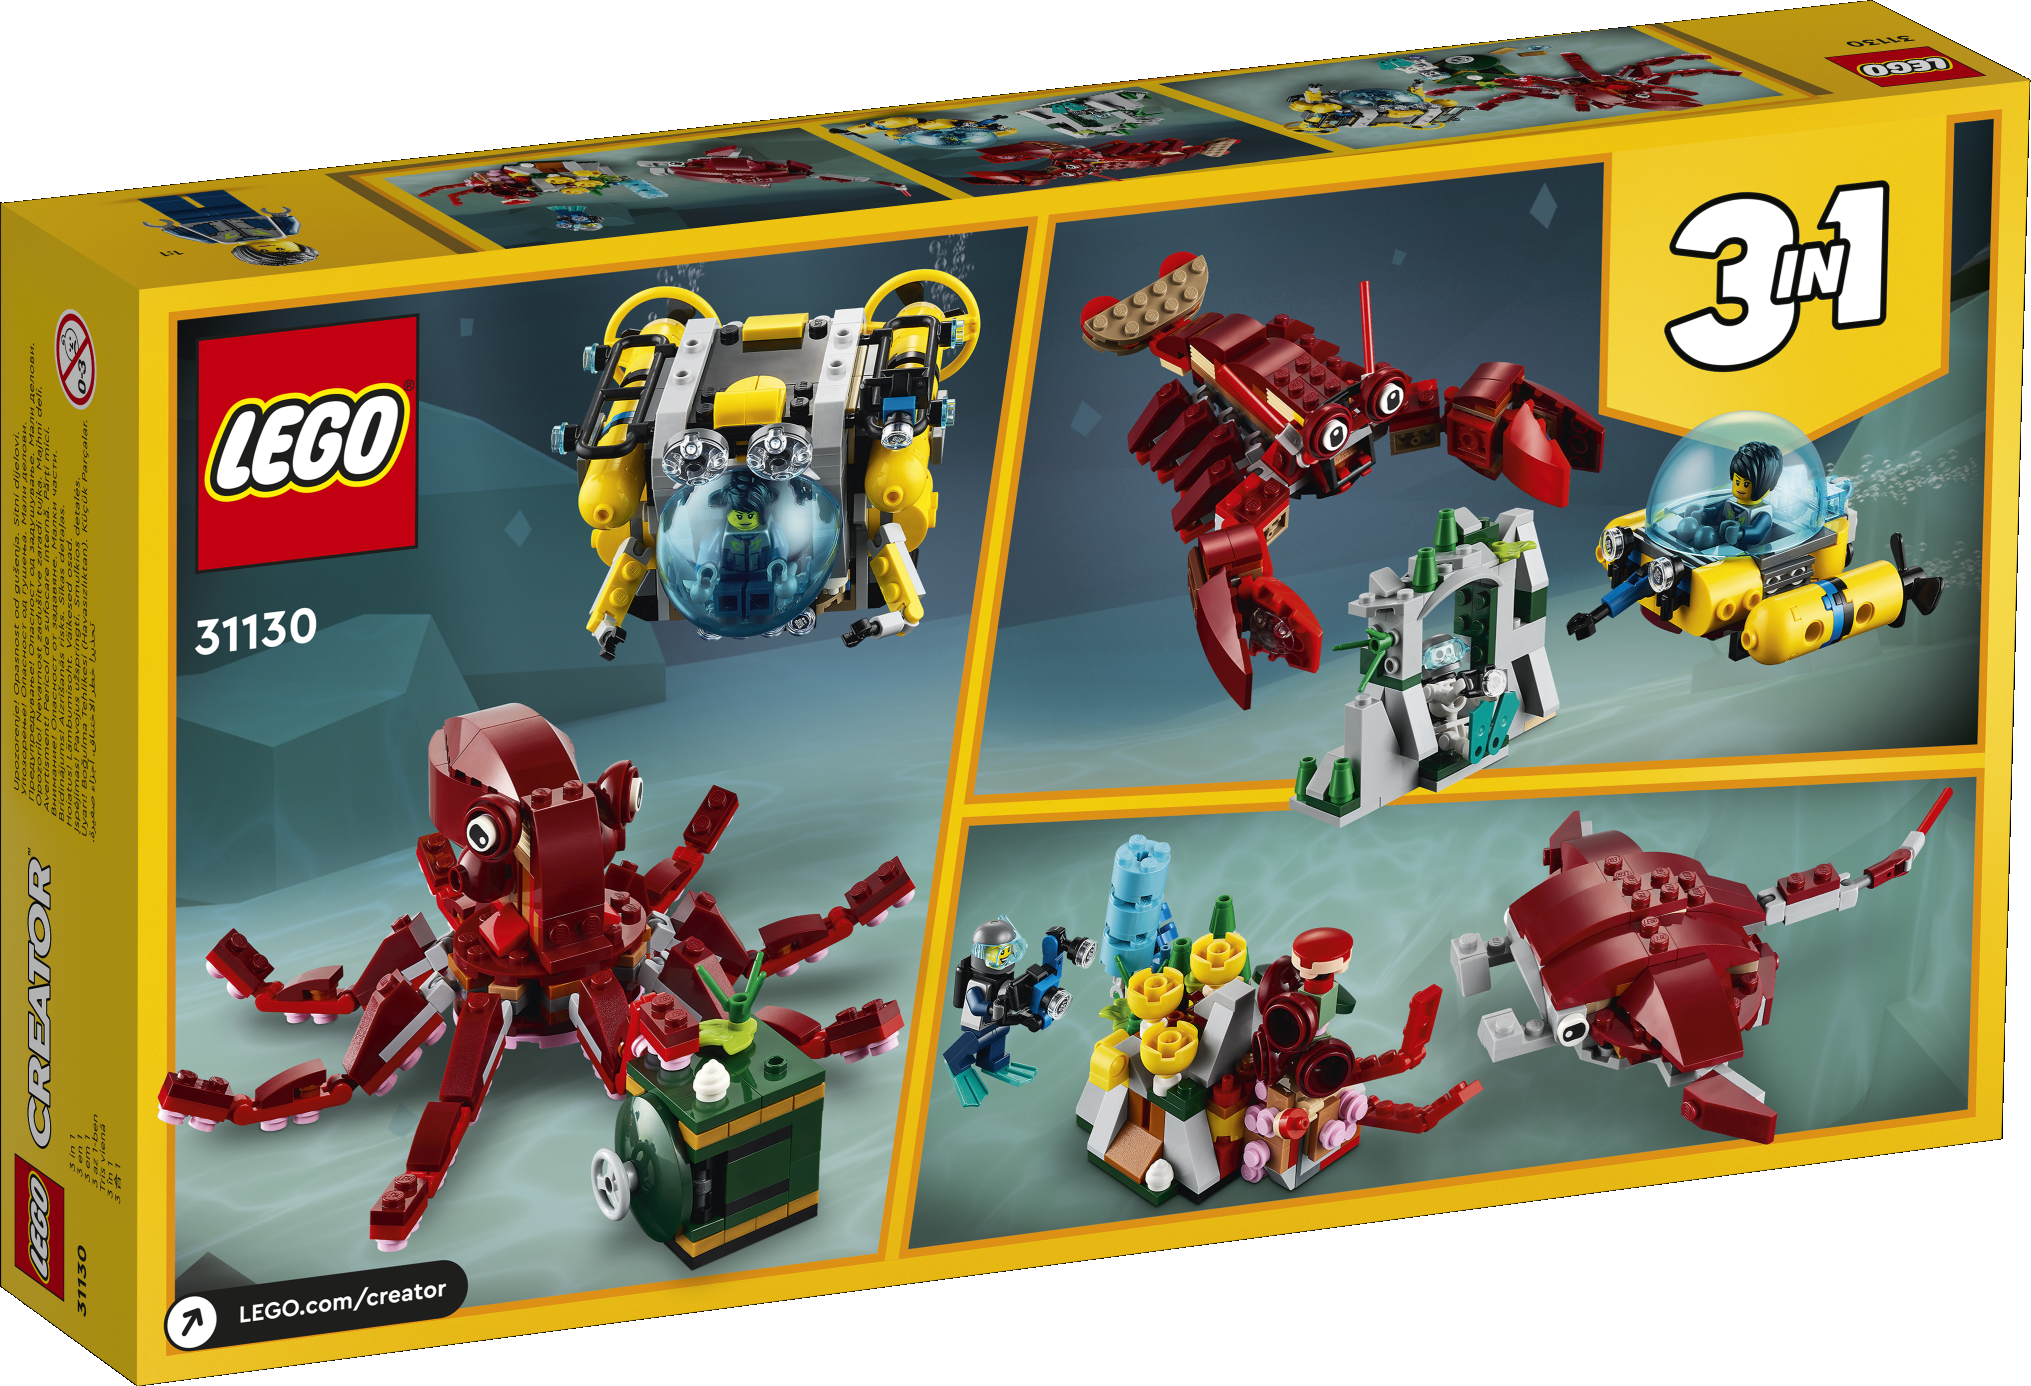
Enjoy incredible underwater adventures with 3 different LEGO playsets. Dive to the bottom of the sea in a submarine to search for sunken treasure guarded by an octopus. Later, rebuild it into a smaller submarine for more action with a giant lobster – or turn it into a giant manta ray for fun with a diver and coral reef. The play possibilities are endless with this brilliant 3in1 set. This page contains the instructions for the giant octopus with sunken treasure and submarine.

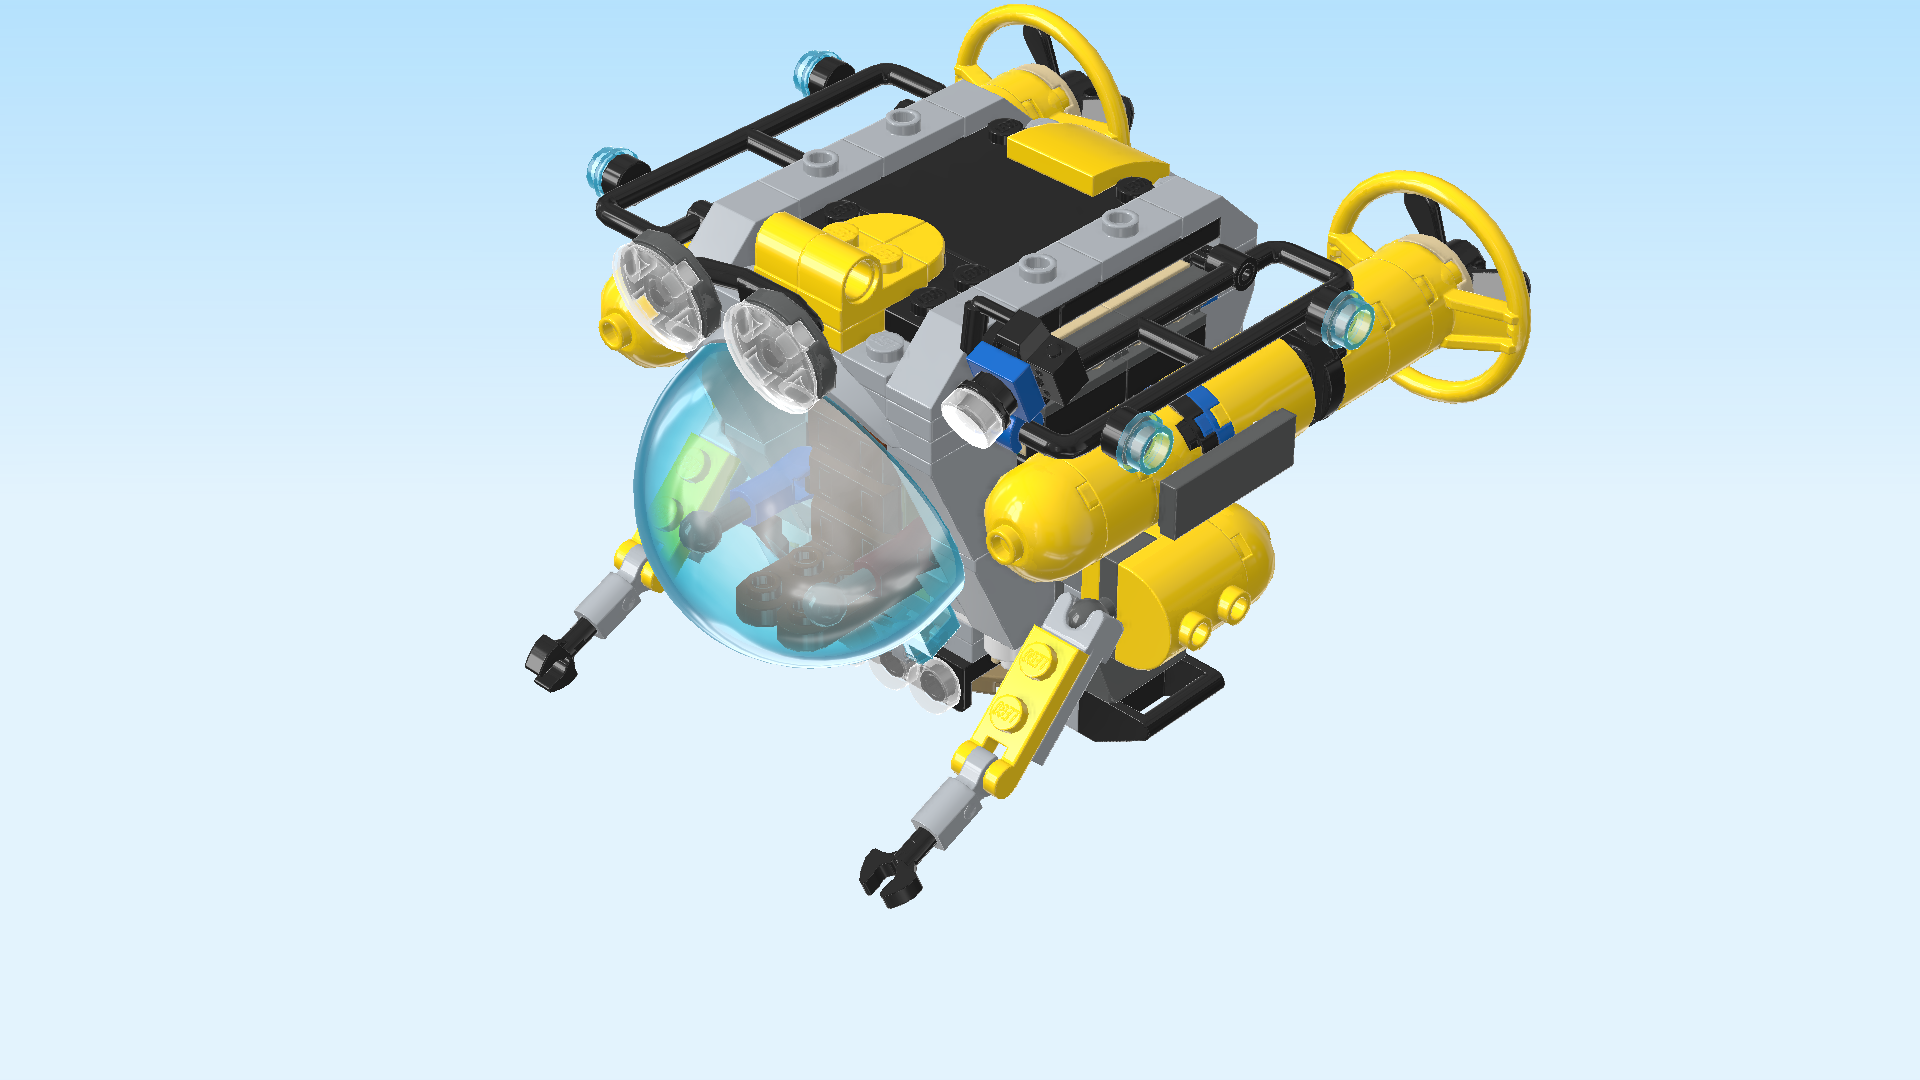
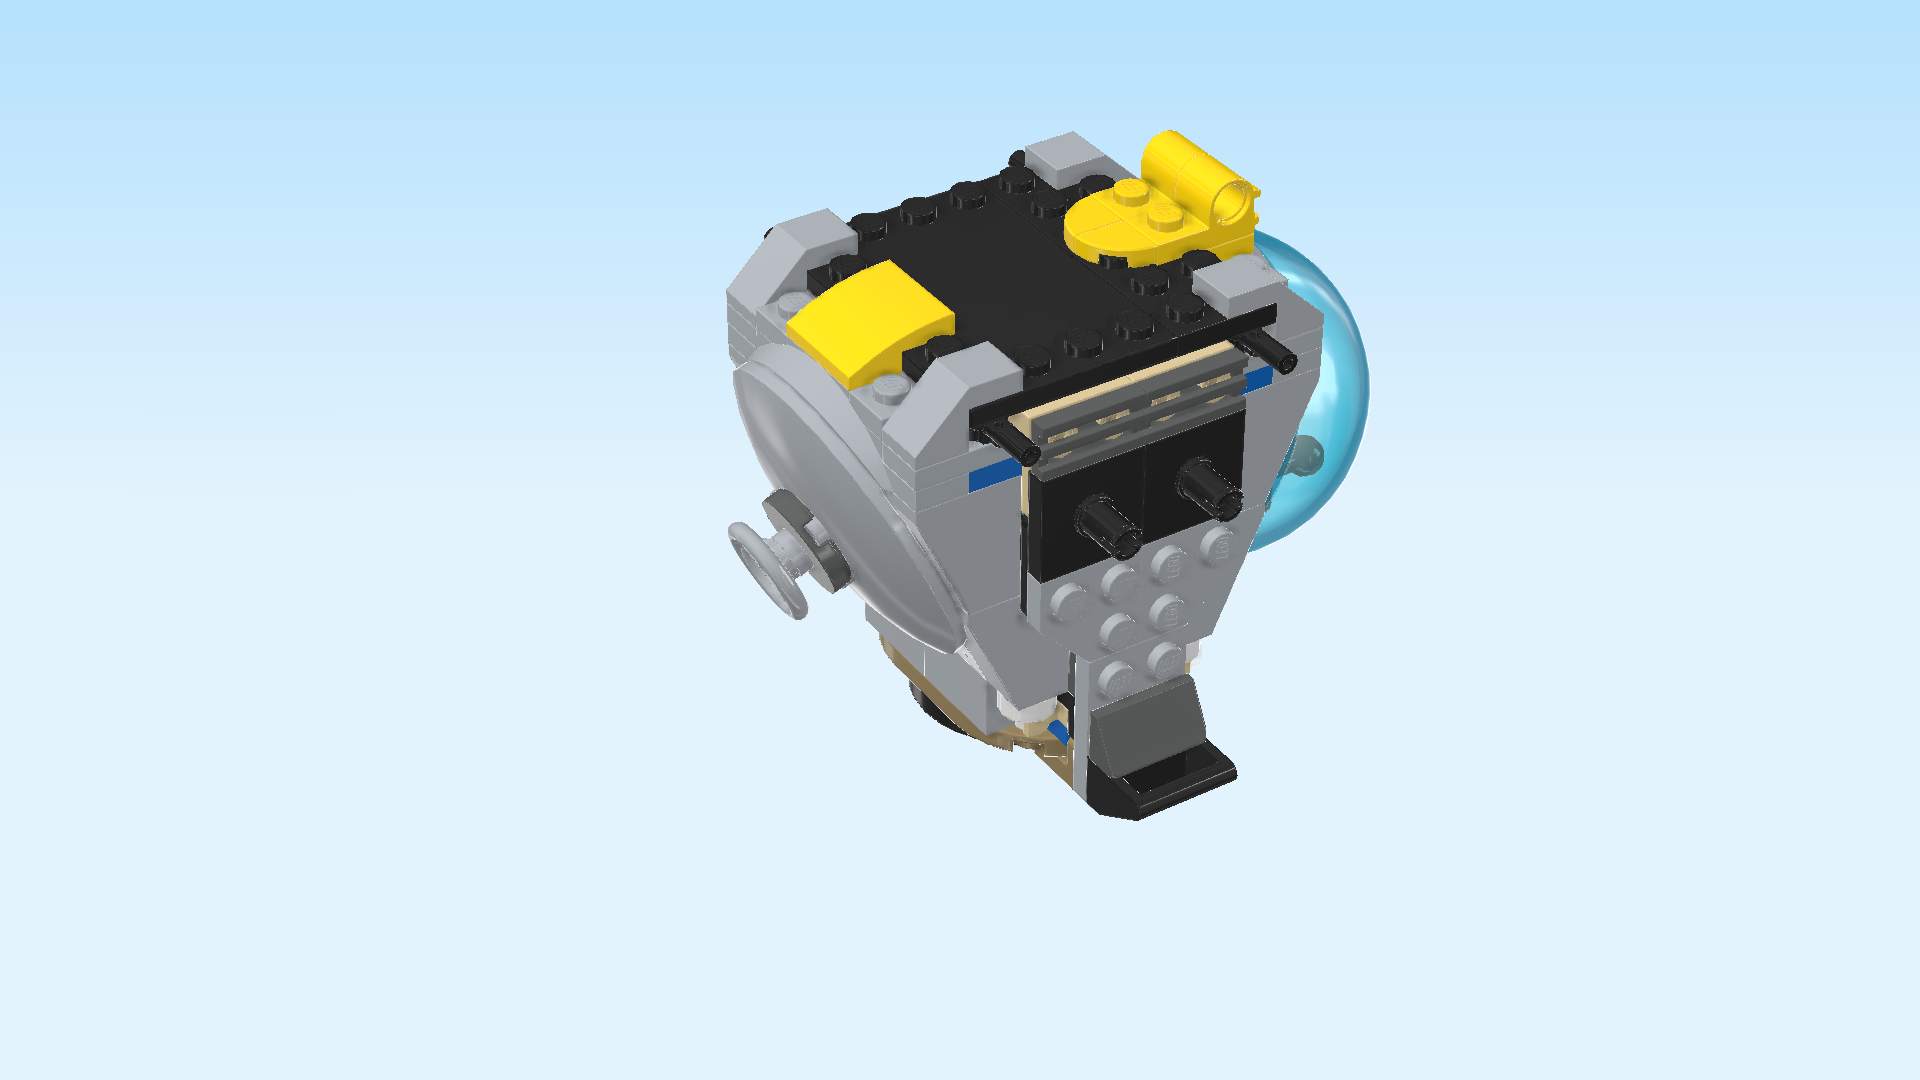
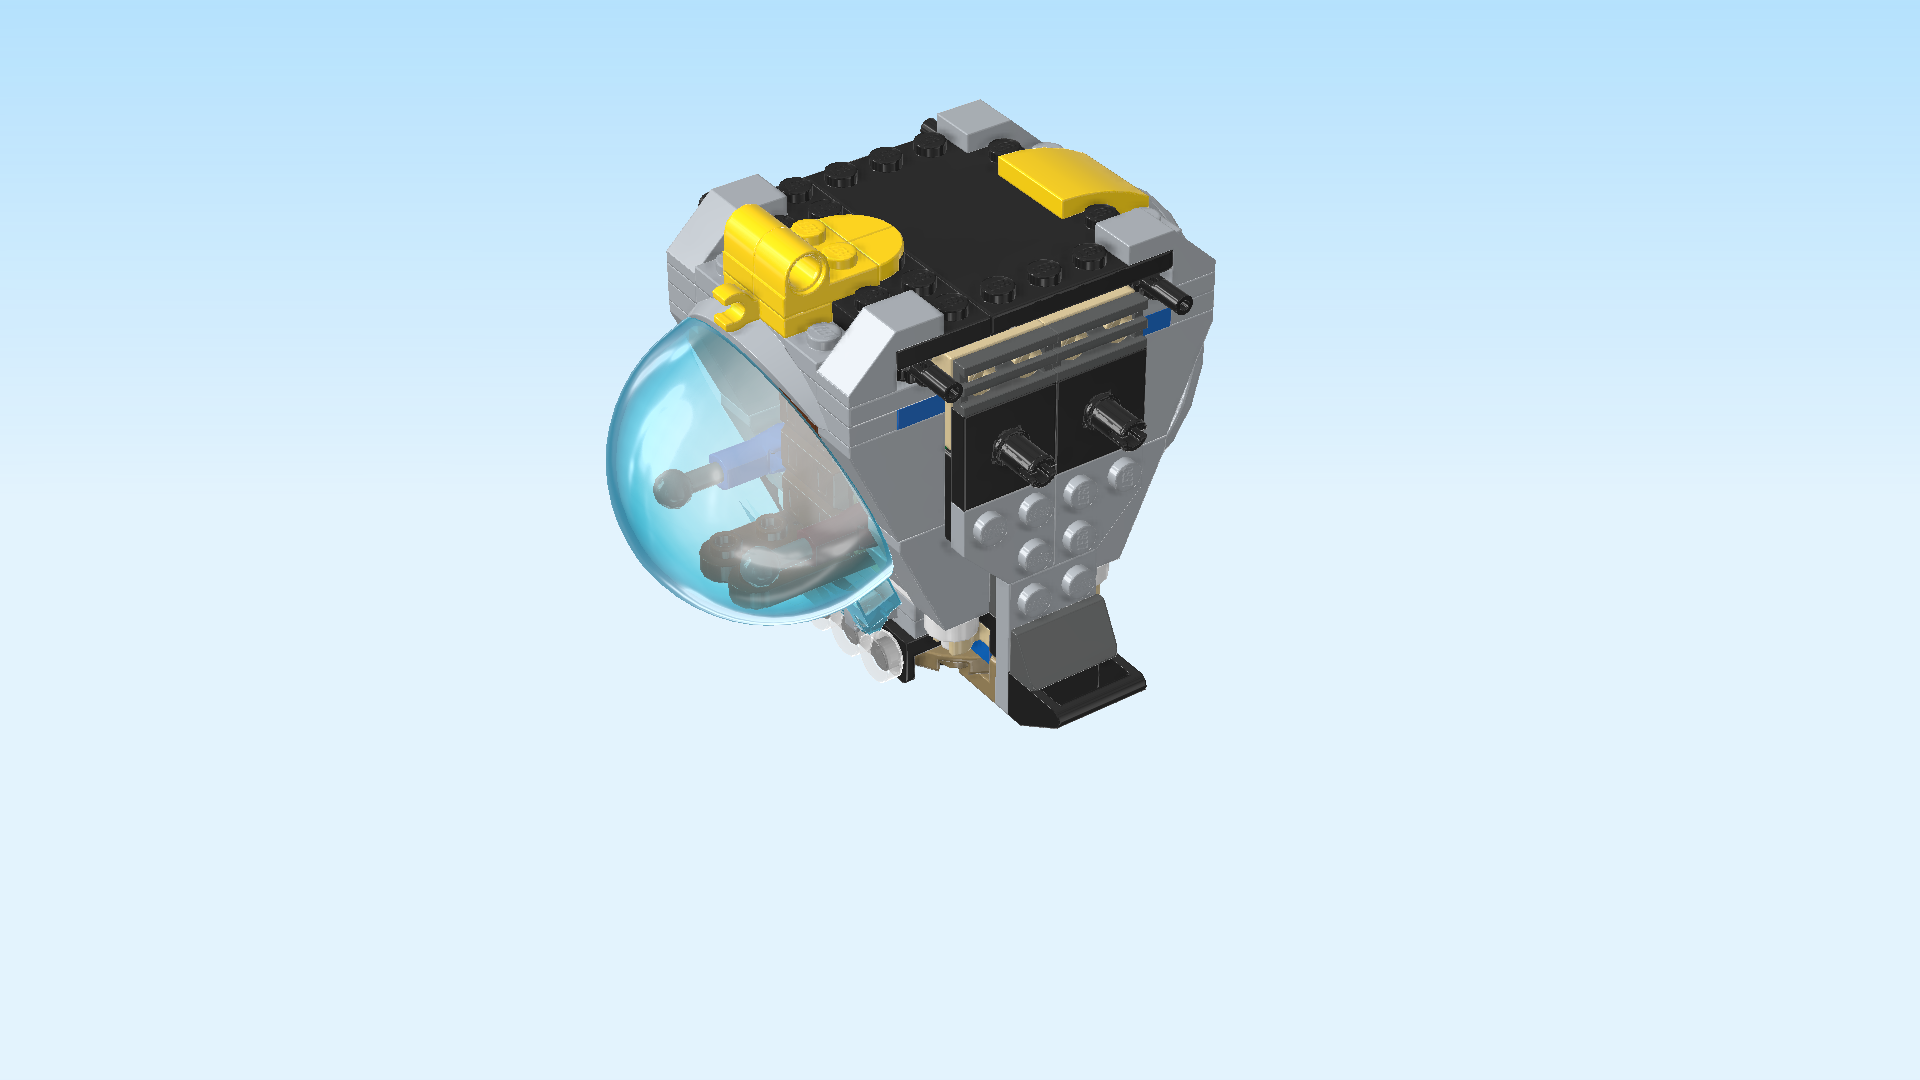
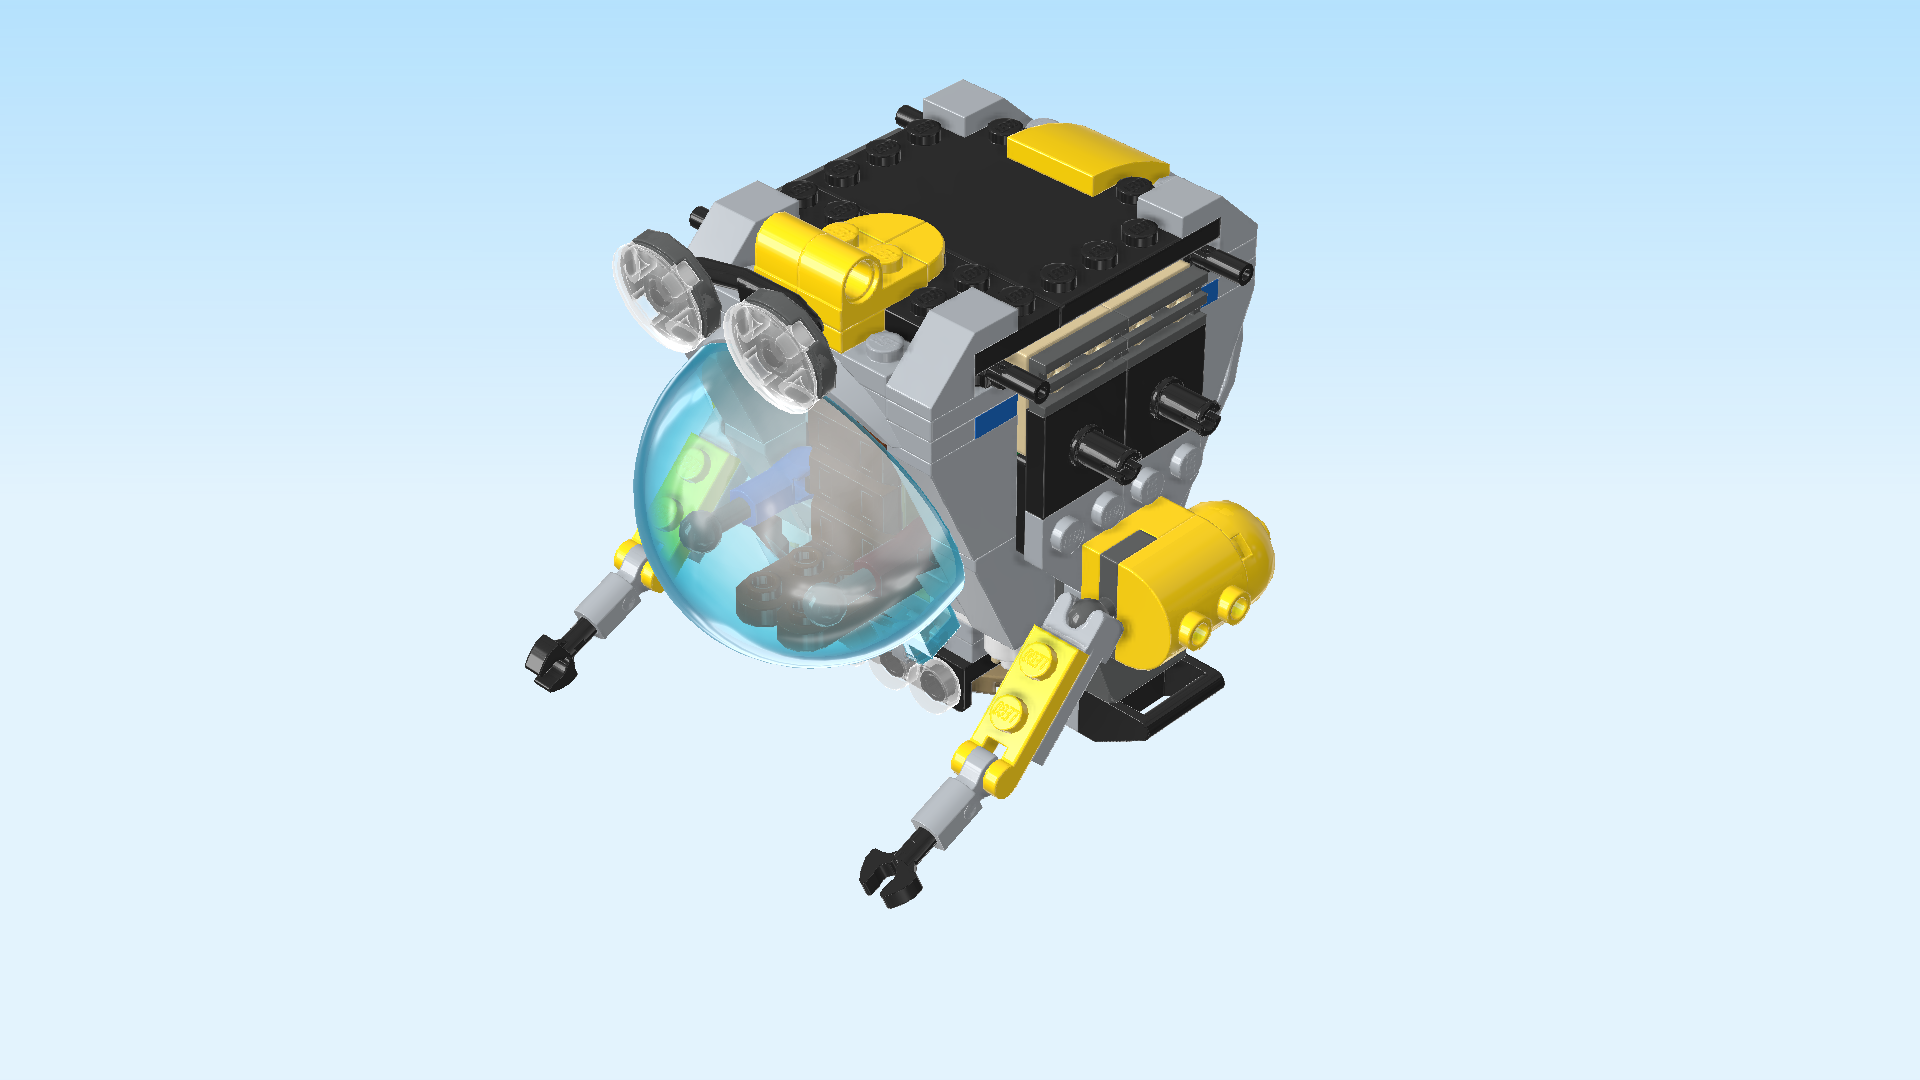
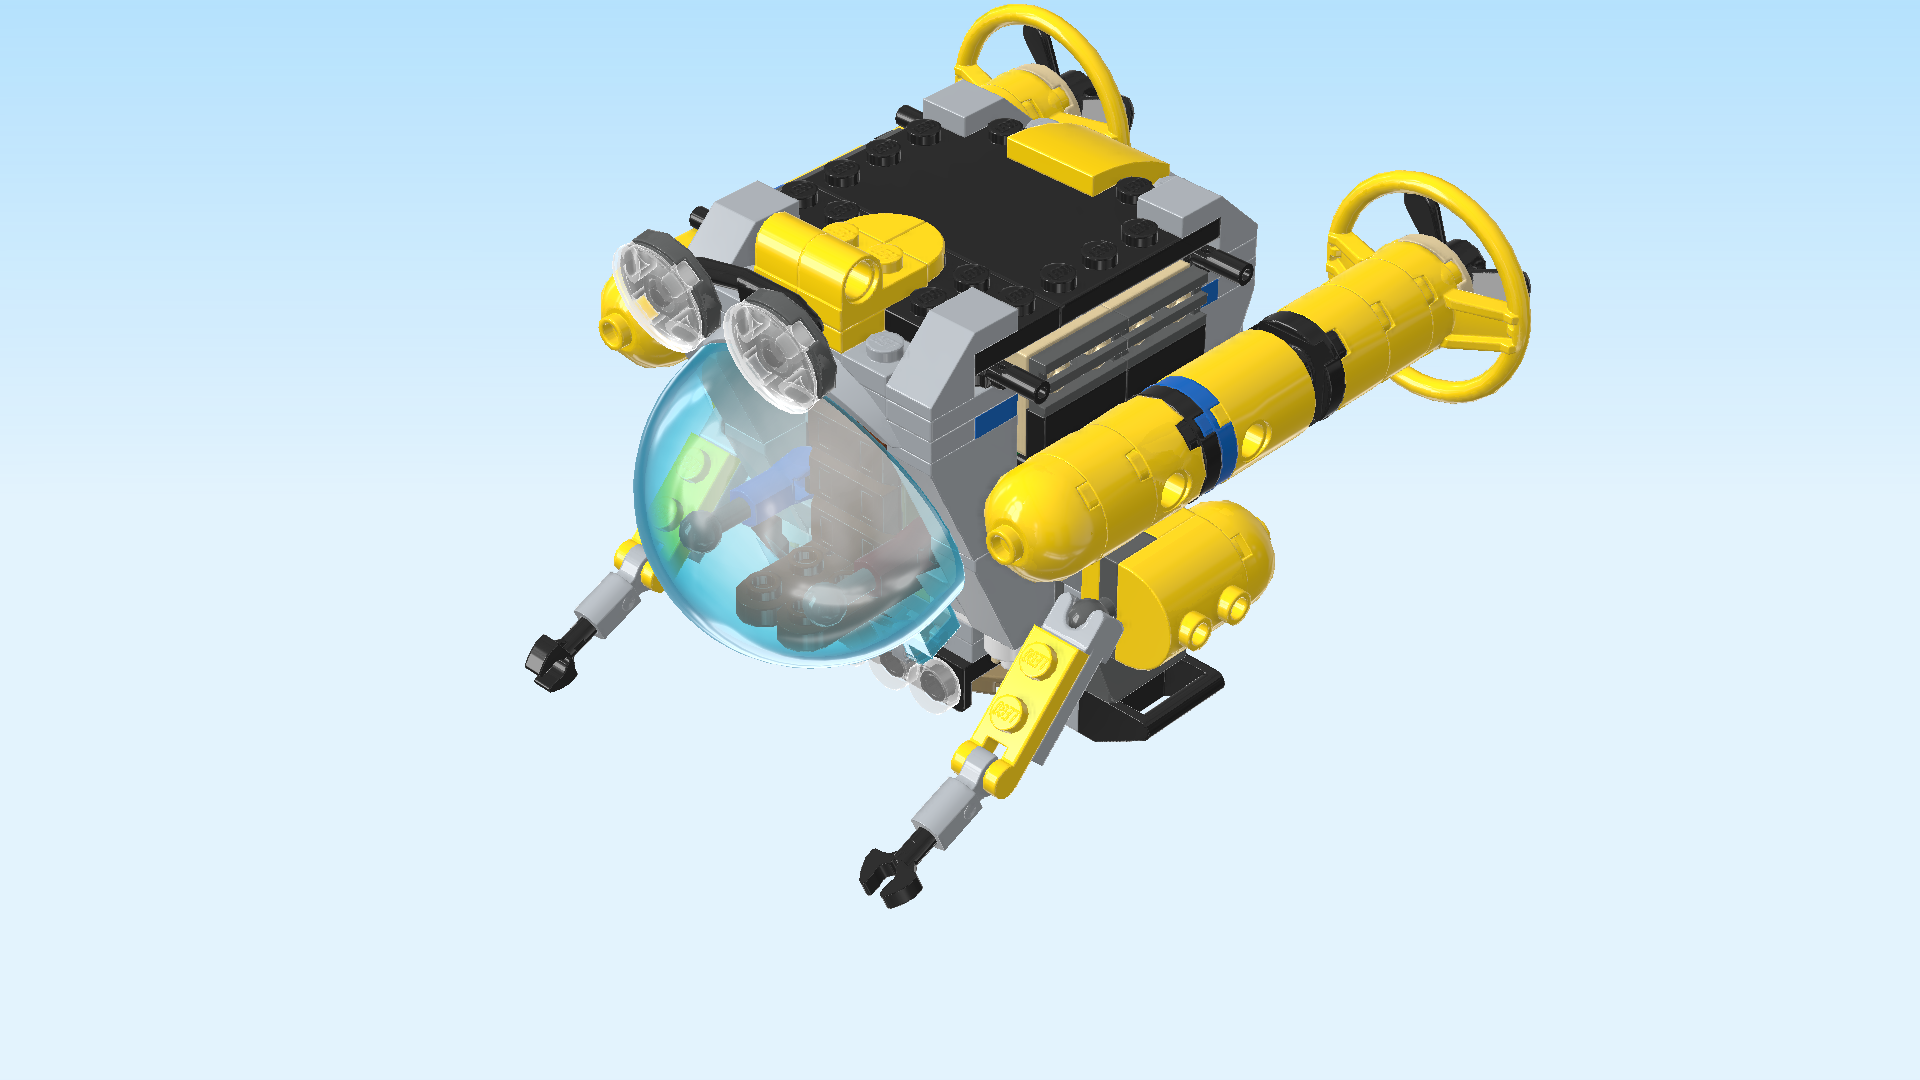
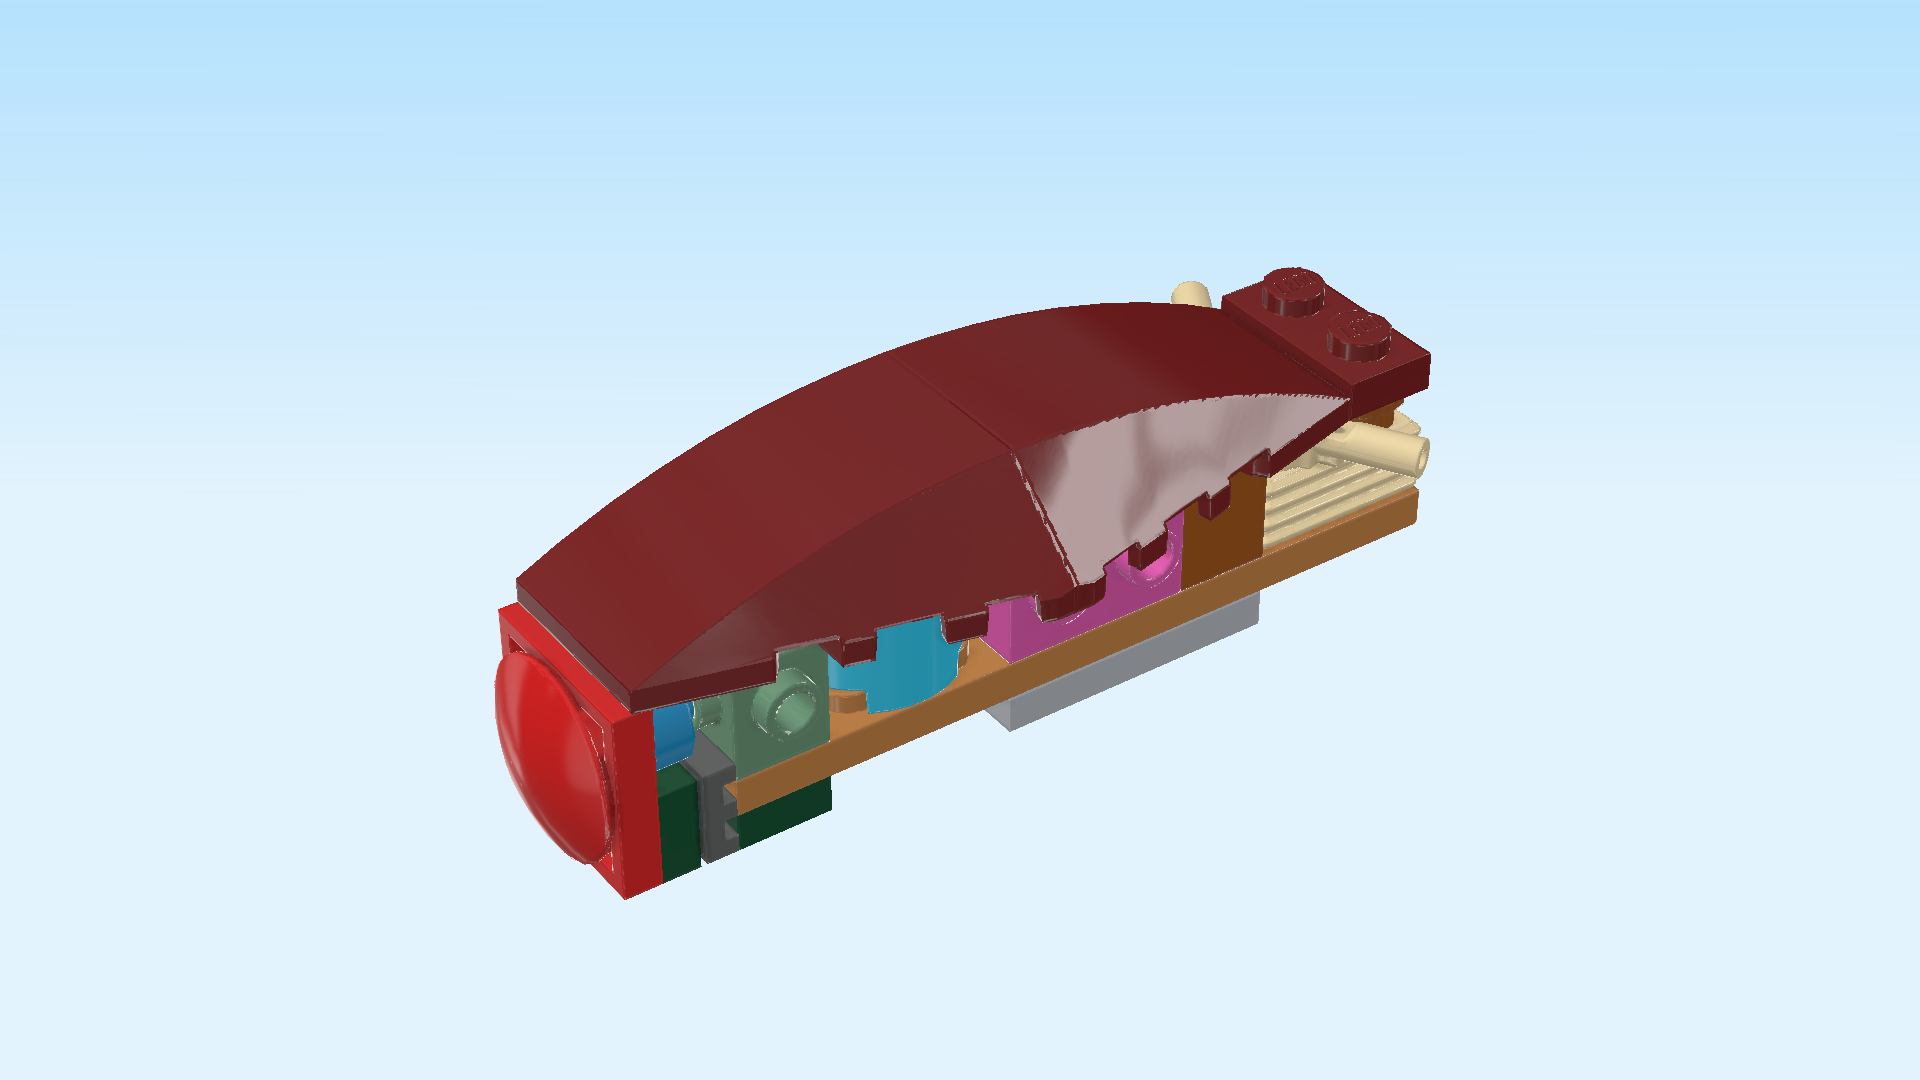
The box cover shows a scene at the bottom of the sea. A giant dark red octopus is resting its eight tentacles on the seabed in the center of the scene. Approaching from behind on the right is a high-tech submarine. It is a propeller-driven vessel with a grey body, big yellow oxygen tanks and propellers, a camera, and 2 remote control arms. It's perfect for exploring the deep blue sea. The submarine pilot is sitting in the cockpit, which is a glass bubble providing a 180° view. At the very bottom of the box cover, there is a sunken gold safe. However, it seems like the sturdy safe door broke open and 2 gold ingots fell out! A skeleton scuba diver is leaning on the side of the safe, probably hiding from the submarine or the octopus. You decide! On the right side of the box cover, there is a vertical yellow banner with the 3-in-1 logo on top as well as small images of the 2 rebuild options of this set. The first is a giant lobster with a smaller submarine and the second is a giant manta ray with a colorful coral reef. If you choose to build those alternative sets first, go to the corresponding site in the audio instructions library. If you want to build them after building the octopus with sunken treasure and submarine, you will have to disassemble the set before you can build the others. But now, let's get started.

Open the box. This can be tricky; ask someone to help you!

The box contains 3 booklets with visual building instructions (one for each 3-in-1 option) and 4 bags with numbers printed on them. Ask a sighted person to help you find the correct bag!

Carefully open the 2 bags with the number 1 on them and any small sub-bags in it. These two bags contain all bricks and pieces for the submarine pilot Minifigure and the submarine.

Before you start building, ask a sighted person to help you sort the pieces by color. This makes finding the correct pieces even easier!

First, we will build the submarine pilot Minifigure.

Collect the following 2 pieces:

1 earth blue pair of legs,

and 1 silver metallic, earth blue and dark stone grey upper part of the body.

Put the upper body on the legs.

Collect the following 2 pieces:

1 bright yellow head,

and 1 black hairpiece with short asymmetrical bob.

Put the head on the body.

Put the hair on top.

The submarine pilot Minifigure is finished! Great job! She is wearing a dark blue diving suit. The jacket of the suit has grey inserts and two neon-green arrows on it. It has functional pockets and zippers; as a submarine pilot you definitely need practical clothing for sure! The head of the submarine pilot is printed with two different faces: one has a determined and curious look, the other one has an expression of excited surprise. The treasures of the sea are marvelous!

Now, we will build the submarine.

Collect the following 2 pieces:

1 black round plate 4x4 with middle hole,

and 1 mud grey plate 2x6 with 2 round corners.

Put the round plate 4x4 on the table. Make sure its knobs form straight rows and columns in front of you.

Put the plate 2x6 horizontally centered on the 2 back rows, rounded corners to the back. It should overhang symmetrically to the left and right.

Find 1 mud grey plate 2x6 with 2 round corners.

Put it horizontally in front of the previous piece, round corners to the front, symmetrically overhanging to the left and right.

Find 2 mud grey bottom angle plates 1x2 - 1x2 with 2 side knobs.

Put 1 vertically underneath the rightmost column, 2 side knobs to the right.

Repeat symmetrically on the left, 2 side knobs to the left.

Collect the following 4 pieces:

2 black top angle plates 1x2 - 1x2 with 2 side knobs,

and 2 bright blue plates 1x2.

Put the 2 top angle plates horizontally next to each other on the frontmost row, all 4 side knobs to the front.

Put 1 plate 1x2 vertically on the rightmost column.

Repeat symmetrically on the leftmost column.

Find 4 transparent round tiles 1x1.

Put them upright on the 4 side knobs pointing to the front.

Find 2 medium stone grey bricks 2x3.

Put them vertically next to each other on the 4 middle columns, but leave the frontmost row empty.

Find 4 pale ocher yellow plates 1x1 with horizontal side clasp.

Put 1 on the back knob of the rightmost column, clasp to the back.

Put another one in front of the previous piece, clasp to the front.

Repeat symmetrically on the leftmost column with the 2 remaining plates.

Next, we will build the mounting bracket for the bubble cockpit.

Collect the following 2 pieces:

1 medium stone grey plate 1x4,

and 1 medium stone grey plate 1x4 with 2 hinge stubs on long side.

Put the plate with hinge stubs horizontally on the table, hinge stubs to the front.

Put the plate 1x4 horizontally on top.

Put the mounting bracket horizontally on the frontmost row of the main structure, hinge stubs to the front.

Find 2 black top angle plates 1x2 - 1x2 with 2 side knobs.

Put 1 vertically on the rightmost column, side knobs to the right.

Repeat symmetrically on the left, side knobs to the left.

Collect the following 2 pieces:

1 dark stone grey flat tile 2x2,

and 1 pale ocher yellow plate 2x2.

Put the flat tile 2x2 on the 2 middle columns at the back edge.

Put the plate 2x2 in front of the previous piece.

Find 2 reddish brown rounded plates 1x5 with middle cross hole.

Put 1 vertically on the left column of the previous piece, middle cross hole and 2 knobs overhanging to the front.

Put the other one vertically to the right of the previous piece, again middle cross hole and 2 knobs overhanging to the front.

Next up, we will make 2 small submarine parts.

Collect the following 2 pieces:

1 white brick 1x1 with side knob and bottom foot,

and 1 medium stone grey smooth roof tile 1x1x⅔.

Put the brick 1x1 on the table, side knob and foot pointing to the right.

Put the roof tile 1x1 upright on the side knob, slope to the bottom.

Collect the following 2 pieces:

1 white brick 1x1 with side knob and bottom foot,

and 1 medium stone grey smooth roof tile 1x1x⅔.

Repeat the previous step: put the brick 1x1 on the table, side knob and foot to the right.

Put the roof tile 1x1 upright on the side knob, slope to the bottom.

Mount 1 small submarine part on the leftmost knob of the backmost row, slope to the back.

Mount the other one on the rightmost knob of the backmost row, slope to the back.

Next, we build 2 stabilizer bars.

Collect the following 2 pieces:

1 white brick 1x1 with side knob and bottom foot,

and 1 medium stone grey smooth roof tile 1x1x⅔.

Again, put the brick 1x1 on the table, this time side knob and foot to the left.

Put the roof tile 1x1 upright on the side knob, slope to the bottom.

Find 1 bright red shaft 4m. (4m means that this shaft is roughly 4 knobs long.)

Insert it from the right into the open side of the brick 1x1. Careful not to push the roof tile off.

This is the first stabilizer bar, let's move on to the second.

Collect the following 3 pieces:

1 white brick 1x1 with side knob and bottom foot,

1 medium stone grey smooth roof tile 1x1x⅔,

and 1 bright red shaft 4m.

Put the brick 1x1 on the table, side knob and foot to the left.

Put the roof tile 1x1 upright on the side knob, slope to the bottom.

Insert the shaft from the right into the open side of the brick 1x1. Careful not to push the roof tile off.

To mount the first stabilizer bar, turn it vertically, shaft protruding towards the back. Insert the back end of the shaft into the brick 1x1 with roof tile on the back row on the left.

Mount the front brick 1x1 of that stabilizer bar on the leftmost knob of the third row from the front.

Mount the other stabilizer bar by inserting the back end of the shaft into the brick 1x1 on the back row on the right.

As before, mount the front brick 1x1 of the stabilizer bar on the rightmost knob of the third row from the front.

Find 2 dark stone grey bottom angle plates 1x2 - 2x2 with 4 side knobs.

Put 1 vertically on the rightmost column, 4 side knobs pointing to the right.

Repeat symmetrically on the left, 4 side knobs to the left.

By now, you should have an even surface with 8 side knobs pointing to the right, and the same to the left.

Find 2 medium stone grey bricks 1x2x1⅔ with 4 side knobs.

Put 1 vertically on the previous piece, 4 side knobs to the right. This means the side knobs are pointing inwards this time.

Repeat symmetrically on the right, 4 side knobs pointing to the left.

Find 2 black bricks 1x1 with horizontal side clasp.

Put 1 on top of the front brick 1x1 of the stabilizer bar on the left, clasp to the front.

Repeat symmetrically on the right: put it on the front brick 1x1 of the right stabilizer bar, clasp to the front.

Find 2 dark stone grey rounded double plates 1x2 with connecting shafts. (This piece is shaped like 2 rounded plates 1x2 that are mounted on top of each other using small connecting shafts.)

Put 1 vertically on the rightmost column.

Repeat symmetrically on the left.

Find 2 black top angle plates 1x2 - 2x4 with 8 side knobs.

Put 1 vertically on top of the previous piece, 8 side knobs pointing to the left.

Repeat symmetrically on the right, 8 side knobs pointing to the right.

Next, we will build the base of the pilot's seat.

Collect the following 2 pieces:

1 medium azure blue round brick 2x2 with top cross hole,

and 1 mud grey bottom angle plate 1x2 - 1x2 with 2 side knobs.

Put the bottom angle plate 1x2 horizontally on the table, 2 side knobs pointing to the front.

Put the round brick on top, back half overhanging to the back.

Find 1 mud grey bottom angle plate 1x2 - 1x2 with 2 side knobs.

Put it horizontally underneath the back half of the round brick 2x2, side knobs pointing to the back.

Collect the following 2 pieces:

1 mud grey bottom angle plate 1x2 - 1x2 with 2 side knobs,

and 1 bright yellow brick 1x2 with side cross hole.

Put the bottom angle plate 1x2 horizontally on the back row of the round brick 2x2, side knobs to the back.

Put the brick 1x2 with side cross hole horizontally on top of the previous piece.

Collect the following 2 pieces:

1 mud grey bottom angle plate 1x2 - 1x2 with 2 side knobs,

and 1 medium stone grey plate 1x4.

Put the plate 1x4 horizontally centered in front of the previous piece, symmetrically overhanging to the right and left.

Put the bottom angle plate 1x2 horizontally on the 2 middle knobs of the previous piece, side knobs to the front.

Find 2 dark green nose cones 1x1.

Put them next to each other on top of the previous piece.

Find 1 black top angle plate 1x2 - 1x2 with 2 side knobs.

Put it horizontally on top of the 2 previous pieces, side knobs to the front.

Find 1 bright blue plate 1x2.

Put it horizontally on top of the previous piece.

Next, we will build the backrest of the pilot's seat.

Collect the following 2 pieces:

1 mud grey plate 2x4,

and 1 reddish brown ingot 1x2.

Put the plate 2x4 vertically on the table.

Put the ingot 1x2 horizontally on the backmost row.

Find 3 reddish brown ingots 1x2.

Put them horizontally on the 3 remaining rows in front of the previous piece. Together, the 4 ingots cover the entire plate 2x4.

The backrest of the pilot's seat is finished! Flip it upright so that the ingots are towards you. Mount it in that orientation on the 6 side knobs pointing to the front.

The base of the pilot's seat is finished! Well done! Mount it in the building orientation on the 2 middle columns of the main submarine structure, backrest to the front. Make sure to leave the 2 frontmost rows of those 2 columns empty.

Find 1 bright red brick 2x6.

First, identify the leftmost and the rightmost column of the submarine structure. Each row only consists of 2 knobs. These will be the mounting positions.

Put it horizontally on the rightmost and leftmost column.

Next up, we will build the first of 2 control levers.

Collect the following 2 pieces:

1 bright blue small tube with shaft, (This piece is roughly as tall as a brick 1x1)

and 1 dark stone grey shaft 1m with ball.

Insert the shaft of the shaft 1m with ball into the small tube. Half of the shaft and the ball should stick out.

Snap the shaft of the control lever on the clasp that is pointing to the front on the left of the seat backrest.

Now, let's make the second control lever.

Collect the following 2 pieces:

1 maroon red small tube with shaft,

and 1 dark stone grey shaft 1m with ball.

Again, insert the shaft of the shaft 1m with ball into the small tube.

Snap the shaft of the second control lever on the clasp to the right of the backrest of the pilot's seat.

Collect the following 2 pieces:

1 pale ocher yellow plate 2x2,

and 1 dark green plate 1x2 with shaft on long side.

Put the plate 2x2 on top of the structure, directly behind the backrest of the pilot's seat. If done correctly, there is one empty row behind this piece.

Put the plate 1x2 horizontally behind the previous piece, shaft to the back.

Find 1 medium stone grey plate 2x3.

Put it vertically on top of the 2 previous pieces.

Next up, we will make another small sub-part.

Collect the following 2 pieces:

1 white plate 1x1 with top clasp,

and 1 medium stone grey plate 1x2 with 1 knob.

Put the plate 1x2 horizontally on the table.

Put the plate 1x1 with top clasp on top. Turn this piece so that its clasp ends are at the front and back, not on the left and right.

First, turn the main structure left to right by 180°. This means that now, the control levers and the backrest of the pilot's seat are pointing to the back.

Mount the sub-part horizontally by snapping its clasp on the middle section of the shaft pointing towards you at the top of the structure.

Find 2 pale ocher yellow skeleton arms with 1 thick clasp and 1 standard clasp.

Snap the standard clasp of 1 arm on the left section of the shaft. Make sure the arm joint in the middle is to the bottom, not to the top.

Repeat symmetrically on the right section of the shaft. Again, the arm joint should point to the bottom.

Let both arms point to the front instead of up or down.

Find 1 white space skeleton body. (This piece is a bit taller than a brick 1x1. It has a small bottom shaft, a longer top shaft with 3 sections, and 1 middle knob.)

Snap the left and right section of the torso top shaft on the thicker clasps of the 2 previous pieces. Make sure the knob is to the bottom and the torso extends to the front.

This shaft-arm-torso-construction is the folding mechanism for the fold-out tailgate. This means that later, the tailgate will be mounted here.

Next, we will assemble the pressure gauge.

Collect the following 2 pieces:

1 black top angle plate 1x1 - 1x1 with top hole and 1 side knob,

and 1 medium stone grey round tile 1x1. (This piece is printed.)

Mount the round tile 1x1 upright on the side knob of the angle plate. It is printed with a black dial indicator with red needle and white, green and red sections indicating the pressure in the oxygen tanks.

Mount the pressure gauge on the knob to the right of the shaft-arms-and-torso construction by putting the top hole on that knob, gauge overhanging to the front.

Collect the following 3 pieces:

1 medium stone grey plate 2x3,

and 2 medium stone grey wedge plates 2x2 with 45° corner and 3 knobs.

Put the plate 2x3 upright vertically on the 6 lowest side knobs pointing to the right.

Put 1 wedge plate 2x2 upright above the back column of the previous piece, cut-off corner to the bottom back.

Put the other wedge plate 2x2 upright in front of the previous piece, cut-off corner to the bottom front.

If done correctly, the top row of side knobs pointing to the right is still empty.

Collect the following 3 pieces:

2 medium stone grey wedge plates 2x2 with 45° corner and 3 knobs,

and 1 medium stone grey plate 2x3.

Before you mount these plates, turn the submarine structure left to right again. Now, the backrest and the control levers should point towards you again.

Let's repeat the previous step: put the plate 2x3 upright on the 6 lowest side knobs pointing to the right.

Put 1 wedge plate 2x2 upright above the back column of the previous piece, cut-off corner to the bottom back.

Put the other wedge plate 2x2 upright in front of the previous piece, cut-off corner to the bottom front.

Next, we will build 4 submarine mainstays.

Since the 4 mainstays are identical, we will collect the pieces for all 4 mainstays in each step, explain the step in question for 1 mainstay and tell you to repeat it for the remaining 3 mainstays.

Collect the following 8 pieces:

4 bright blue plates 1x2,

and 4 dark green nose cones 1x1.

Put 1 plate 1x2 horizontally on the table.

Put 1 nose cone 1x1 on the left knob.

Repeat for the remaining 3 mainstays.

Find 4 medium stone grey roof tiles 1x2x2, 65°.

Put 1 horizontally to the right of the previous piece, slope to the right, one half overhanging to the right.

Repeat for the remaining 3 mainstays.

Find 4 black bricks 1x1 with horizontal side clasp.

Put 1 on top of the nose cone, clasp to the left.

Repeat for the remaining 3 mainstays.

Find 4 medium stone grey roof tiles 1x2x2, 65°.

Put 1 horizontally on top of the 2 previous pieces, slope to the right. The slopes of the 2 roof tiles currently mounted should form a relatively evenly sloped descending surface.

Repeat for the remaining 3 mainstays.

Find 4 white round plates 1x1 with top shaft.

Put 1 on top of the previous piece.

Repeat for the remaining 3 mainstays.

The 4 submarine mainstays are finished! Well done! Two mainstays will be mounted to the left and right of the pilot's seat and they will partly slide into the structure towards its center. Continue for detailed instructions.

Identify the small connecting shaft of the rounded double plate 1x2 on the left side. It is roughly on the same level as the topmost row of side knobs pointing to the left, and it is towards the center of the structure.

Now, turn 1 mainstay upside down, slope to the front, clasp to the back, round plate 1x1 with top shaft to the bottom.

Snap the clasp of the mainstay on the small connecting shaft described above. At the same time, snap the small shaft at the bottom of the mainstay into the clasp at the bottom of the submarine structure.

Repeat symmetrically on the right. Turn the second mainstay upside down, slope to the front, and snap its clasp into the small connecting shaft at the top. At the same time, snap the small bottom shaft into the clasp pointing to the front at the bottom.

The mounting configuration at the back of the submarine structure is exactly the same. Mirror the mounting orientation of the 2 front mainstays to mount the 2 back mainstays. This time, the slopes are to the back.

This was a particularly tricky part, very well done!

Next, we build a top frame construction.

Collect the following 3 pieces:

2 medium stone grey plates 1x8,

and 1 medium stone grey mudguard screen 1x6 with steps and 6 knobs. (This piece is like a bent plate 1x6 with 2 steps up and 2 steps down as well as a mudguard screen.)

Put the mudguard screen horizontally on the table, round screen to the back.

Put 1 plate 1x8 vertically on the leftmost knob of the mudguard screen, 7 knobs overhanging to the front.

Repeat symmetrically on the right.

Find 1 medium stone grey mudguard screen 1x6x with steps and 6 knobs.

Mount it horizontally underneath the front knobs of the 2 previous pieces, round screen to the front.

Find 4 medium stone grey top angle plates 1x1 - 1x1 with side knob.

Put 1 on the second knob from the left on the backmost row, side knob pointing to the front. This means the side knob is facing inwards.

Repeat symmetrically on the second knob from the right.

Put 1 on the second knob from the left on the frontmost row, side knob to the back.

Repeat symmetrically on the second knob from the right.

The top frame construction is finished! Well done! Mount it on top of the submarine structure, round screens to the front and back. It should match the outline of the top surface.

Find 4 pale ocher yellow top angle plates 1x2 - 2x2 with 4 side knobs.

Put 1 vertically on the third and fourth knob of the rightmost column from the back, side knobs to the right.

Put 1 vertically in front of the previous piece, side knobs to the right.

If done correctly, the two pieces sit next to each other on the rightmost column and there are 2 empty knobs in front of them and 2 empty knobs behind them.

Repeat symmetrically on the leftmost column with the 2 remaining pieces, side knobs to the left.

Collect the following 4 pieces:

2 black plates 2x2 with vertical top connector,

and 2 dark stone grey grille tiles 1x2.

Put the 2 grill tiles upright horizontally next to each other on the topmost row of side knobs pointing to the right.

Put the 2 plates 2x2 with vertical connector upright next to each other below the 2 previous pieces, connectors pointing to the right.

Find 1 transparent light blue dome 6x6x3 with 2 hinge forks.

Snap its hinge forks on the hinge stubs below the pilot's seat. If folded up, the dome should extend outwards, pointing to the front.

Collect the following 4 pieces:

2 black plates 2x2 with vertical top connector,

and 2 dark stone grey grille tiles 1x2.

Turn the submarine structure left to right. This means the bubble cockpit is now to the back.

Put the 2 grille tiles 1x2 upright horizontally next to each other on the topmost row of the side knobs pointing to the right.

Put the 2 plates with vertical connector upright next to each other below the 2 previous pieces, connectors to the right.

Find 4 black round plates 1x1 with side handle.

Put 1 on the second knob from the front of the rightmost column, side handle to the right.

Put 1 on the second knob from the back of the rightmost column, side handle to the right.

Repeat symmetrically on the left, side handles to the left.

Collect the following 2 pieces:

1 black plate 2x6,

and 1 bright yellow plate 1x2 with vertical clasp on long side.

Put the plate 1x2 horizontally centered on the backmost row, clasp to the back. This means the clasp will protrude over the mudguard screen at the back.

Put the plate 2x6 horizontally in front of the previous piece. This means it will cover the second and third row from the back.

Collect the following 4 pieces:

2 bright yellow plates 1x2 with top tube,

and 2 bright yellow quarter-circle tiles 1x1.

Put the 2 plates 1x2 with tubes vertically on the 2 middle rows starting from the back edge, tubes to the back.

Put the 2 quarter-circle plates 1x1 in front of the two previous pieces. Make sure they form a half-circle together.

Find 1 black plate 4x6 with 12 knobs. (The 12 knobs are arranged on 3 edges of the plate. The rest of the plate is smooth.)

Put it horizontally in front of the previous pieces, edge without knobs to the back.

If done correctly the frontmost row remains empty.

Collect the following 5 pieces:

4 medium stone grey smooth roof tiles 1x1 with overhanging top tile 1x1,

and 1 bright yellow one-stepped curve tile 2x2x⅔.

Put 1 roof tile 1x1 vertically on the leftmost column starting from the back, overhanging top tile to the front.

Repeat symmetrically on the rightmost column.

Put 1 roof tile 1x1 vertically on the leftmost column, this time starting from the front, overhanging top tile to the back.

Repeat symmetrically on the rightmost column.

Put the one-stepped curve tile 2x2 centered between the 2 previous pieces on the 2 frontmost rows, slope to the front.

Next, we will build the fold-out tailgate.

Collect the following 2 pieces:

1 medium stone grey satellite screen 6x6,

and 1 dark stone grey round plate 2x2 with 1 knob.

Put the satellite screen 6x6 on the table, 4 knobs to the top.

Put the round plate 2x2 on top.

Find 1 medium stone grey steering wheel 2x2. (This is the smaller steering wheel in this set. It does not have any knobs. Do not confuse it with the larger steering wheel 4x4 with 4 knobs.)

Mount it on the knob of the previous piece.

Find 1 black open end wrench.

First, flip the tailgate upside down so that the steering wheel is at the bottom.

Now, insert the handle of the wrench from the top into the hole in the middle.

The fold-out tailgate is finished! Great job! Snap the clasp of the wrench into the small shaft sticking out towards the front at the top of the submarine.

You can fold the tailgate down to close the submarine and fold it up to store equipment in the trunk.

Collect the following 2 pieces:

1 black plate 1x2 with angled top handle,

and 1 dark stone grey smooth roof tile 1x2x⅔.

Put the plate 1x2 with top handle upright horizontally on the 2 bottommost knobs of the side knobs pointing to the right. Make sure the angle is to the bottom.

Put the roof tile 1x2 upright horizontally above the previous piece, slope to the top.

Collect the following 2 pieces:

1 black plate 1x2 with angled top handle,

and 1 dark stone grey smooth roof tile 1x2x⅔.

Turn the submarine structure left to right again so that the bubble cockpit is pointing to you again.

Repeat the 2 previous steps: put the plate 1x2 with top handle upright horizontally on the 2 bottommost knobs of the right side knobs, angle to the bottom.

Put the roof tile 1x2 upright horizontally above the previous piece, slope to the top.

Find 1 black angled handlebar with bottom shaft. (This is shaped like the handlebar of a bicycle or a motorbike.)

Snap the small bottom shaft into the clasp pointing to the front above the bubble cockpit. Fold it up and make sure the handles are pointing towards you.

Next, we will build 2 front floodlights.

Collect the following 2 pieces:

1 transparent inverted curve disk 2x2 with 4 knobs,

and 1 dark stone grey round plate 2x2 with 1 knob.

Put the inverted curve disk 2x2 on the table, curve to the bottom.

Put the round plate 2x2 on top.

Collect the following 2 pieces:

Another transparent inverted curve disk 2x2 with 4 knobs,

and another dark stone grey round plate 2x2 with 1 knob.

Again, put the inverted curve disk 2x2 on the table, curve to the bottom, and put the round plate 2x2 on top.

The 2 front floodlights are finished! Mount them on the handlebar above the bubble cockpit: insert the ends of the handlebar into the hollow knobs of the round plates. The inverted curve disks should point to the front.

Next, we will build 2 remote control arms of the submarine.

Since the 2 remote control arms are identical, we will collect the pieces for both control arms in each step, explain the step in question for 1 control arm and tell you to repeat it for the second one.

Collect the following 4 pieces:

2 bright yellow one-stepped plates 2x2x⅔ with 2 side knobs,

and 2 dark stone grey plates 1x2 with ball on long side.

Put 1 one-stepped plate 2x2 on the table, side knobs pointing to the back.

Put 1 plate 1x2 with ball horizontally on the front row, ball to the front.

Repeat for the second control arm.

Find 2 bright yellow half-cylinder bricks 2x2 with 2 knobs.

Put 1 on top of the 2 previous pieces. Make sure its 2 knobs form a column, the curve of the half-cylinder running from left to right.

Repeat for the second control arm.

Find 2 bright yellow domes 2x2 with 1 knob.

Mount 1 upright on the 2 side knobs pointing to the back. Make sure it is aligned with the top curvature of the half-cylinder brick.

Repeat for the second control arm.

Next, we make 2 gripper arms.

Collect the following 4 pieces:

2 medium stone grey plates 1x2 with ball cup on short side,

and 2 bright yellow plates 1x2 with shaft on short side.

Put 1 plate 1x2 with ball cup vertically on the table, ball cup to the back.

Put 1 plate 1x2 with shaft vertically on top, shaft to the front.

Repeat for the second gripper arm.

Now, we will make 2 sub-parts of the 2 gripper arms.

Collect the following 2 pieces:

1 medium stone grey small tube with clasp,

and 1 black open end wrench.

Insert the handle of the wrench into the small tube.

Collect the following 2 pieces:

Another medium stone grey small tube with clasp,

and another black open end wrench.

Again, insert the handle of the wrench into the small tube.

Snap the clasp of this sub-part on the small shaft of the gripper arm.

Repeat for the second gripper arm.

The 2 gripper arms are finished! Snap their ball joints on the 2 balls on the control arm bases.

The 2 remote control arms of the submarine are finished! Great job! Turn 1 upright so that the half cylinder with 2 knobs is pointing to the right, and the arm extends towards the front.

Mount it on the 4 bottommost side knobs pointing to the right directly above the smooth roof tile 1x2.

Repeat symmetrically on the left, half cylinder with 2 knobs pointing to the left, and arm extending towards the front.

Now, we build the 2 oxygen tanks.

The oxygen tanks are identical. We will collect the pieces for both tanks, describe the building steps for 1 tank and then ask you to repeat it for the second tank.

Collect the following 4 pieces:

2 bright blue round plates 2x2,

and 2 black round plates 2x2.

Put 1 blue round plate 2x2 on the table and put 1 black round plate 2x2 on top.

Repeat for the second oxygen tank.

Collect the following 4 pieces:

2 bright yellow round bricks 2x2 with side hole,

and 2 bright yellow round bricks 2x2 with top cross hole.

Put 1 round brick 2x2 with side hole on top of the 2 previous pieces. Make sure the side hole is running from left to right.

Put 1 round brick 2x2 (without side hole) on top of the previous piece.

Repeat for the second oxygen tank.

Find 2 bright yellow domes 2x2 with 1 knob.

Put 1 on top of the previous piece, and repeat for the second oxygen tank.

Find 2 bright yellow round bricks 2x2x2 with side hole.

Put 1 underneath 1 of the 2 oxygen tanks. Make sure that the side hole is running from left to right again. It is important that both side holes of 1 tank have the same orientation.

Repeat for the second oxygen tank. Again, it is very important that the side holes of each oxygen tank have the same orientation.

Find 2 black cross axles 4m. (4m means that these pieces are 4 knobs long each.)

Hold 1 oxygen tank in your hand and insert 1 cross axle from below into the previous piece. ¾ of the cross axle will stick out.

Repeat for the second oxygen tank.

The 2 oxygen tanks are finished! Great job! Flip one upright, cross axle pointing to the back, dome pointing to the front. Mount 1 tank by putting the 2 lower connectors pointing to the right into the side holes of the oxygen tank. This will only work if the side holes have the same orientation.

Repeat symmetrically with the second oxygen tank on the left, cross axle to the back.

Next, we will build 2 submarine propellers.

Collect the following 4 pieces:

2 black round plates 2x2,

and 2 bright yellow round bricks 2x2 with top cross hole.

Put the 2 round plates on the table.

Put 1 round brick on top of each round plate.

Find 2 bright yellow round bricks 2x2 with top cross hole.

Put 1 on top of each propeller structure.

Find 2 bright yellow steering wheels 4x4 with 4 knobs.

Put 1 on top of each propeller structure.

Collect the following 4 pieces:

2 pale ocher yellow round tiles 2x2 with middle hole,

and 2 pale ocher yellow connector pegs 2m with cross axle pin.

Put the 2 round tiles on the 2 previous pieces.

Insert the cross axle pins into the holes of the 2 previous pieces. The smooth connector pegs stick out to the top.

Find 2 black propellers with 3 blades.

Put the bushings in the middle of the 2 propellers on the 2 connector pegs.

The 2 submarine propellers are finished! Well done! Flip 1 upright, propeller to the back, and insert the left cross axle pointing to the back into the propeller structure.

Repeat symmetrically on the right with the second propeller.

Find 4 white connector pegs 1m with knob.

Insert 2 connector pegs into the side holes on the right edge of the oxygen tanks. Only the knobs will stick out.

Repeat symmetrically on the left edge of the left oxygen tank.

Find 2 dark stone grey flat tiles 1x3.

Put 1 upright horizontally on the 2 previous pieces.

Repeat symmetrically on the right side of the right oxygen tank.

Find 2 black balustrades 1x8x2 with 2 top bushings.

Hold 1 in your hand so that its 2 top bushings are pointing to the left, and the 2 bottom feet to the right. The top bushings are through-holes, while the 2 bottom feet are closed and a bit wider.

Insert the 2 shafts pointing to the right at the top of the structure into the 2 top bushings.

Repeat symmetrically on the left.

Find 4 transparent light blue round plates 1x1.

Flip 1 knob 1x1 upright and insert its knob into the bottom foot at the back of the previous piece.

Repeat symmetrically on the bottom foot at the front.

Repeat symmetrically on the right with the 2 remaining pieces.

Now, we will build the submarine camera.

Collect the following 2 pieces:

1 black camera piece, (This is like an old-school handheld camera device in the size suitable to a Minifigure)

and 1 bright blue plate 1x1 with vertical side clasp.

Put the plate 1x1 upright on the front knob of the camera piece, clasp to the bottom.

Find 1 black round plate 1x1 with through-hole.

Put it upright on the knob of the previous piece.

Find 1 transparent round tile 1x1.

Put it upright on the previous piece.

The submarine camera is finished! Great job! Snap its bottom clasp on the balustrade railing at the front right of the submarine.

Find 4 medium stone grey plates 1x2 with 1 knob.

Put 2 vertically next to each other on the rightmost column on the top surface. This means they will be mounted between the 2 smooth roof tiles 1x1 with overhanging top plate.

Repeat symmetrically on the left.

The submarine is finished! Well done! Time for the pilot to board the submarine and start exploring the sea! With the help of the big oxygen tanks, the pilot is able to dive really deep and find out what's waiting at the bottom of the sea.

Open the 2 bags with the number 2 on them. You can choose to have the bricks sorted by color again. This bag contains all bricks and pieces for the skeleton diver Minifigure, the sunken gold safe and the giant octopus.

Now, we build the skeleton diver Minifigure.

Collect the following 3 pieces:

1 white skeleton torso with 2 arm shafts and 2 leg shafts, (this piece also has a discernible ribcage)

and 2 white skeleton feet 1x1 with top clasp.

Snap the 2 skeleton feet on the 2 leg shafts which are the shafts below the ribcage. Make sure the little skeleton toes are to the front on both feet.

Find 2 white skeleton arms. (A skeleton arm is like a bent shaft that forms an elbow, and it has 1 clasp on each end. Do not confuse them with the black skeleton arms.)

Snap the skeleton arms on the arm shafts to the left and right of the ribcage. Make sure the elbows are pointing to the bottom.

Find 1 black pair of oxygen tanks.

Put it around the neck of the skeleton, oxygen tanks to the back.

Collect the following 3 pieces:

1 white Minifigure head,

and 2 teal blue flippers. (These are swimming fins you can wear for faster diving or swimming.)

Put the head on the skeleton. It is printed with a skull with 2 black circles for eye sockets, a black triangle for the nose opening and a big skeleton grin.

Mount the flippers on the skeleton's feet.

Next, we will assemble the diver's helmet.

Collect the following 2 pieces:

1 dark stone grey helmet with thick chin strap,

and 1 transparent light blue diving goggles with snorkel.

Hold the helmet in your hand, opening to the right.

Put the diving goggles on from the right, snorkel to the back.

Put the diver's helmet on the skeleton.

The skeleton diver Minifigure is finished! Well done! The skeleton is a treasure hunter. Will it find the gold before the submarine gets there? Keep building to find out!

Now, we will build the sunken gold safe.

Collect the following 2 pieces:

1 black plate 4x4,

and 1 dark stone grey flat tile 2x2.

Put the plate 4x4 on the table.

Put the flat tile 2x2 in the center of the previous piece.

Find 1 dark stone grey grille tile 1x2.

Put it vertically to the left of the previous piece.

Find 10 warm gold plates 1x1.

Put them on the 10 remaining knobs of the base plate 4x4.

Collect the following 4 pieces:

1 mossy green brick 1x1,

and 3 mossy green bricks 1x2.

Put 1 brick 1x2 horizontally on the backmost row starting from the left.

Put 1 brick 1x2 horizontally to the right of the previous piece.

Put 1 brick 1x2 vertically in front of the previous piece on the right edge.

Put the brick 1x1 in front of the previous piece.

Collect the following 2 pieces:

1 mossy green flat tile 1x1,

and 1 mossy green plate 1x2.

Put the plate 1x2 horizontally to the left of the previous piece on the frontmost edge.

Put the flat tile 1x1 to the left of the previous piece.

Collect the following 4 pieces:

3 mossy green bricks 1x2,

and 1 mossy green brick 1x1.

Put the brick 1x1 on the leftmost knob of the back row.

Put 1 brick 1x2 horizontally to the right of the previous piece.

Put 1 brick 1x2 vertically to the right of the previous piece.

Put 1 brick 1x2 vertically in front of the previous piece.

Next up, we will build the safe door hinge.

Collect the following 2 pieces:

1 black plate 1x2 with horizontal clasp on short side,

and 1 mossy green brick 1x2.

Put the plate 1x2 horizontally on the table, clasp to the left.

Put the brick 1x2 horizontally on top.

Collect the following 2 pieces:

1 black plate 1x2 with horizontal clasp on short side,

and 1 dark stone grey shaft 2m with middle stop.

Put the plate 1x2 on top of the previous piece, clasp to the left.

Snap the shaft upright into the 2 clasps on the left.

The safe door hinge is finished! Put it horizontally on the frontmost row, hinge to the left. Make sure the hinge is directly above the flat tile 1x1 on the front row.

Collect the following 3 pieces:

2 mossy green plates 1x4,

and 1 mossy green plate 1x2.

Put 1 plate 1x4 horizontally on the back row.

Put the plate 1x2 vertically in front of the previous piece's rightmost knob.

Put the other plate 1x4 horizontally on the front row.

Find 4 warm gold plates 1x1.

Put them on the 4 knobs of the rightmost column.

Find 6 warm gold plates 1x1.

Put 3 of them on the 3 remaining knobs of the back row.

Repeat on the front row.

Find 2 mossy green plates 2x4 with 2 knobs.

Put 1 vertically on the right half of the safe.

Put the other one vertically on the left half of the safe.

Find 2 black bent skeleton arms with 2 clasps.

Hold 1 flat in your hand so that the elbow of the arm is pointing to the back, 2 clasps to the left and right.

Keep it in that orientation and snap the right clasp on the upper end of the door hinge.

Repeat with the second arm on the lower end of the door hinge.

Next, we will build the safe door.

Collect the following 2 pieces:

1 mossy green disk 4x4 with 1 knob,

and 1 medium stone grey steering wheel 2x2.

Put the disk 4x4 on the table, make sure its knob is to the top.

Put the steering wheel 2x2 on top.

Find 1 white T-shaped shaft 2m x 1m.

Flip the safe door upside down so that the steering wheel is at the bottom.

Insert the shorter shaft from the top into the middle hole of the door.

The part of the T-shaped shaft still sticking out should form a cross bar. If it is L-shaped, remove it and try a different shaft end.

The secret cave door is finished! Turn the safe so that its opening is towards you. Snap the 2 clasps on the cross bar on the inside of the safe door. Now, you can open and close the safe.

Collect the following 4 pieces:

2 warm gold ingots 1x2,

1 transparent light blue heart-shaped crystal with shaft,

and 1 transparent bright bluish violet diamond with shaft.

Put the treasure into the safe and close it.

Find 1 bright yellowish green round plate 1x1 with 3 leaves.

Put it on the knob in the back left corner, leaves pointing to the front.

Collect the following 2 pieces:

1 dark green plant base 1x1 with 3 stalks,

and 1 white swirly ice cream scoop 1x1.

Insert the bottom shaft of the plant base into the knob of the previous piece.

Put the swirly ice cream scoop 1x1 on the knob in the front right corner.

The sunken gold safe is finished! Well done! Hide it in the depths of the sea. Let's be quick and build the octopus, the guardian of the sunken treasure!

Now, we will build the giant octopus.

Collect the following 2 pieces:

1 medium azure blue round brick 2x2 with top cross hole,

and 1 maroon red round plate 6x6 with middle hole.

Put the round plate 6x6 on the table. Make sure its knobs form straight rows and columns in front of you.

Put the round brick 2x2 in the center of the previous piece.

Collect the following 12 pieces:

8 bright red round plates 1x1 with top shaft,

and 4 black round plates 1x1 with through-hole.

Put 2 of the red round plates with shaft in front of the round brick 2x2, 2 of them to its left, 2 of them to its right, and 2 of them behind the round brick 2x2.

Put the 4 black round plates in the 4 corners between the previous pieces. If done correctly, only the front and back rows and the left and right columns remain empty. They only consist of 2 knobs each.

Now, we will build 4 of 8 tentacle mounts.

We will start with 1, explaining it in detail, and then we will instruct you to build the remaining 3 identically.

Collect the following 2 pieces:

1 dark stone grey plate 1x2 with ball on long side,

and 1 dark orange plate 1x2.

Put the plate 1x2 horizontally on the table.

Put the plate 1x2 with ball horizontally on top, ball to the front.

Find 1 dark orange plate 1x2.

Put it horizontally on top.

Collect the following 9 pieces:

3 dark stone grey plates 1x2 with ball on long side,

and 6 dark orange plates 1x2.

Build the 3 remaining tentacle mounts exactly like the first one: put 3 dark orange plates horizontally on the table. Put the plates with ball horizontally on top, balls to the front. Put the 3 remaining orange plates horizontally on top.

The 4 mounting brackets for the tentacles are finished! Well done! Mount 1 horizontally on the frontmost row, ball to the front.

Repeat symmetrically at the back, ball to the back.

Mount 1 vertically on the rightmost column, ball to the right.

Repeat symmetrically on the left, ball to the left.

Find 2 light purple half-circle plates 3x6 with cut-out 1x2.

Flip the octopus structure upside down.

Mount 1 half-circle plate on the left half, cut-out to the right.

Mount the other half-circle plate on the right half, cut-out to the left.

Next, we will build the remaining 4 tentacle mounts.

Careful: they are a bit different from the first 4 tentacle mounts. Again, we will start with 1 mount.

Collect the following 2 pieces:

1 medium nougat brown plate 1x2 with 1 knob,

and 1 dark stone grey plate 1x2 with ball on short side.

Put the plate 1x2 with ball vertically on the table, ball to the front.

Put the plate 1x2 with 1 knob vertically on top.

Collect the following 6 pieces:

3 medium nougat brown plates 1x2 with 1 knob,

and 3 dark stone grey plates 1x2 with ball on short side.

Build the 3 remaining tentacle mounts exactly like the first one: put the plates with ball vertically on the table, ball to the front, and put the plates with 1 knob vertically on top.

The remaining 4 tentacle mounts are finished! Well done! First, flip the structure right side up again. Make sure the balls that are already mounted are pointing to the front and back and to the left and right.

Mount 1 diagonally to the right of the front row mount, ball pointing to the front right. Make sure it is centered on the 1 hollow knob there. This means that the back of the mount almost touches the round brick 2x2 in the middle.

Mount another tentacle mount diagonally to the left of the front row mount, ball pointing to the front left.

Repeat symmetrically at the back. When you are done, there should be 8 evenly distributed balls pointing outwards.

Find 1 maroon red round plate 6x6 with middle hole.

Put it on top of the structure.

Collect the following 2 pieces:

1 bright red plate 2x2,

and 1 dark orange roof tile 2x2, 45°.

First, make sure again that the previous piece, which is now the top surface, forms straight rows and columns in front of you.

Mount the plate 2x2 on the rightmost edge of the 2 middle rows.

Put the roof tile 2x2 on top of the previous piece, slope to the right.

Collect the following 4 pieces:

2 bright red smooth roof tiles 1x2x⅔,

and 2 pale ocher yellow round plates 1x1 with side handle.

Put 1 round plate with side handle on the front knob of the previous piece, side handle to the front.

Put the other round plate with side handle behind the previous piece, side handle to the back.

Put 1 roof tile 1x2 horizontally centered on the second row from the front, slope to the front.

Put 1 roof tile 1x2 horizontally centered on the second row from the back, slope to the back.

Next, we will build the octopus head.

Collect the following 3 pieces:

1 medium nougat brown plate 2x8 with 7 holes,

1 pale ocher yellow low profile brick 2x2x⅔, (This brick has horizontal grooves on its sides and is a bit lower than a standard brick)

and 1 dark orange brick 1x2.

Put the plate 2x8 horizontally on the table.

Put the low profile brick 2x2 on the 4 rightmost knobs.

Put the brick 1x2 vertically to the left of the previous piece.

Collect the following 3 pieces:

2 bright purple bricks 1x2 with 2 side knobs,

and 1 medium azure blue round brick 2x2 with top cross hole.

Put 1 brick 1x2 horizontally to the left of the previous piece on the back row, side knobs to the back.

Put the other brick 1x2 horizontally in front of the previous piece, side knobs to the front.

Put the round brick 2x2 to the left of the previous piece.

Find 2 sand green bricks 1x1 with 1 front and 1 side knob.

Put 1 to the left of the previous piece on the back row, 1 knob to the back, 1 knob to the left.

Put the other one in front of the previous piece, 1 knob to the left, 1 knob to the front.

Collect the following 4 pieces:

2 dark orange round plates 1x1,

and 2 pale ocher yellow round plates 1x1 with side handle.

Put the 2 round plates (without shaft) on the 2 rightmost knobs.

Put the 2 round plates with side shaft to the left of the 2 previous pieces, shafts to the front right and back right.

Collect the following 2 pieces:

1 medium stone grey plate 2x3,

and 1 mossy green plate 1x2.

Flip the octopus head structure upside down. Make sure the shafts are still on the right half of the structure.

Put the plate 1x2 vertically on the leftmost edge.

Skip 2 columns to the right and mount the plate 2x3 horizontally there. The empty spaces to the left and right of the plate 2x3 should be the same size (2x2) .

Find 1 maroon red plate 1x2.

Flip the structure right side up again. The shafts should still be on the right half of the structure.

Put it vertically on the rightmost column.

Now, we will make the first part of the head's outer skin.

Collect the following 2 pieces:

1 mud grey plate 2x4,

and 1 bright red plate 2x2.

Put the plate 2x4 horizontally on the table.

Put the plate 2x2 on the 4 middle knobs.

Find 2 maroon red curve pieces 4x4x1 with 3 sloped sides.

Put 1 horizontally over the 2 left columns of the 2 previous plates, long slope to the left.

Put the other one horizontally to the right of the previous piece, long slope to the right.

The first part of the head's outer skin is finished! Great job! Mount it horizontally to the left of the vertical plate 1x2 mounted on the rightmost column. It will slightly protrude to the left.

Now, we will build the backing plate of the octopus head.

Collect the following 2 pieces:

1 bright red plate 2x2,

and 1 mossy green plate 1x2.

Put the plate 2x2 on the table.

Put the plate 1x2 vertically on the left column.

Collect the following 3 pieces:

1 dark stone grey grille tile 1x2,

and 2 dark azure blue round plates 1x1 with top shaft.

Put the grille tile 1x2 vertically on the previous piece.

Put the 2 round plates with shaft on the right column.

Find 1 bright red inverted curve disk 2x2 with 4 knobs.

Flip the backing plate structure upside down.

Mount the inverted curve disk on the structure.

The backing plate of the octopus head is finished! Mount it upright on the 2 side knobs pointing to the left. This means that the 2 small shafts are inserted into the 2 side knobs.

Next up, we will cover the second and third side of the head with skin.

Collect the following 2 pieces:

1 medium stone grey plate 2x2,

and 1 maroon red one-stepped curve tile 2x3.

Put the plate 2x2 on the table.

Put the curve tile 2x3 horizontally on the right column, curve to the right, ⅔ overhanging to the right.

Find 1 maroon red one-step curve tile 2x3.

Put it horizontally on the left column, curve to the left, ⅔ overhanging to the left.

Collect the following 3 pieces:

1 medium stone grey plate 2x2,

and 2 maroon red one-step curve tiles 2x3.

Repeat the previous steps: First, put the plate 2x2 on the table.

Put 1 curve tile 2x3 horizontally on the right column, curve to the right, ⅔ overhanging to the right.

Put the other curve tile horizontally on the left column, curve to the left, ⅔ overhanging to the left.

The second and third parts of the head's outer skin are finished! Well done! Mount one part upright horizontally on the side knobs pointing to the front. Make sure the left edge of the part is flush with the left edge of the top skin.

Repeat symmetrically with the other part at the back. Again, make sure its left edge is flush with the left edge of the top skin.

Next, we will make the fourth and last side of the head's outer skin.

Collect the following 2 pieces:

1 pale ocher yellow low profile brick 2x2x⅔,

and 1 bright red curve piece 3x4 with 3 sloped sides.

Put the profile brick on the table.

Put the curve piece 3x4 on the right column, long slope to the right, ⅔ overhanging to the right.

Find 1 bright red curve piece 3x4 with 3 sloped sides.

Put it on the left column, long slope to the left, ⅔ overhanging to the left.

Find 1 black cross axle 2m with 2 grooves.

Flip the current structure upside down.

Insert the cross axle into the hole in the middle of the structure. About half of the cross axle will stick out towards the top.

The fourth side of the head's outer skin is finished! Great job! Flip the head structure so that the long side that's not covered is facing up.

To mount the fourth skin part, insert its cross axle from the top into the first hole from the left. The low profile brick will fit perfectly into the 2x2 recess around that hole.

Find 1 bright yellow cross axle 7m.

First, flip the octopus head structure on its side. Make sure it is still horizontally and the last long side without curved tiles is pointing to the back. There should be a hole pointing towards the front on the right edge.

Insert the cross axle from the front into said hole. Most of the cross axle will stick out towards the front.

Find 2 dark orange bricks 2x2 with 4 vertical grooves and cross hole.

Flip 1 upright, knobs to the back, and insert the cross axle into the middle hole of the brick. Push it all the way in.

Repeat with the second one: put it upright on the cross axle, pushing it all the way in.

The octopus head is finished! Well done! Before mounting, turn it so that the cross axle is on the left and pointing to the bottom. The head should be extending towards the right.

Insert the cross axle into the hole in the middle of the octopus structure. The cross axle will protrude through the bottom plate of the octopus body, so you need to hold both parts in your hand.

If done correctly, the head will also connect to the 2 round plates 1x1 with side handle.

Collect the following 2 pieces:

1 light nougat brown round plate 2x2,

and 1 black nose cone 1x1.

Turn the octopus structure upside down. Put the round plate 2x2 on the cross axle, but make sure the knobs are pointing to the top.

Put the nose cone 1x1 on the cross axle as well, narrow end to the top.

Now, we will build the forehead of the octopus.

Collect the following 2 pieces:

1 dark orange plate 1x2,

and 1 bright red plate 2x2.

Put the plate 2x2 on the table.

Put the plate 1x2 vertically on the left column.

Collect the following 2 pieces:

1 maroon red angled flat tile 2x2 with top middle plate 1x2,

and 1 maroon red one-stepped curve tile 2x3.

Put the curve tile 2x3 horizontally on the right column, curve to the right, ⅔ overhanging to the right.

Put the plate 1x2 of the angled flat tile on the left column, flat tile 2x2 overhanging on the left side.

The forehead of the octopus is finished! Well done! Flip the octopus structure right side up again. Make sure the head extends to the right. Due to the nose cone at the bottom, it will be lopsided and quite wobbly.

Mount the forehead upright vertically on the left edge of your structure, slope to the top, angled flat tile connecting to 4 knobs at the left edge.

Now, we will build 2 octopus cheeks.

Collect the following 3 pieces:

1 bright red round tile 2x2 with middle hole,

1 bright yellowish green round plate 1x1 with through-hole,

and 1 black round plate 1x1 with through-hole.

Put the round tile 2x2 upside down on the table.

Put the black round plate 1x1 upside down on the middle hole of the previous piece.

Put the bright yellowish green round plate 1x1 upside down on top of the previous piece.

Find 1 maroon red inverted dome 2x2 with 1 knob.

Put it upside down on the previous 3 pieces, knob to the top. This means its wider end fits perfectly into the round tile 2x2.

Collect the following 4 pieces:

1 bright red round tile 2x2 with middle hole,

1 bright yellowish green round plate 1x1 with through-hole,

1 black round plate 1x1 with through-hole,

and 1 maroon red inverted dome 2x2 with 1 knob.

Repeat the previous steps for the second cheek: put the round plate 2x2 upside down on the table.

Put the black round plate 1x1 on top, then put the bright yellowish green round plate 1x1 on top.

Put the inverted dome 2x2 on top, wider end to the bottom, knob to the top.

The 2 octopus cheeks are finished! Well done! Mount 1 upright on the lower side handle sticking out towards the front. To do so, insert the handle into the hole of the round tile 2x2, dome and knob pointing to the front.

Repeat symmetrically at the back with the second cheek, dome and knob to the back.

Now, we will build the 2 octopus eyes.

Collect the following 3 pieces:

1 white round tile 1x1, (this piece is printed)

1 light purple round plate 1x1,

and 1 dark orange round plate 1x1.

Put the dark orange round plate 1x1 on the table.

Put the light purple round plate 1x1 on top.

Put the white round tile 1x1 on top. It is printed with an eye.

Find 1 maroon red inverted dome 2x2 with 1 knob.

Put it on the table, knob to the bottom.

Insert the 1x1 pieces into the middle of the inverted dome.

Collect the following 4 pieces:

1 white round tile 1x1,

1 light purple round plate 1x1,

1 dark orange round plate 1x1,

and 1 maroon red inverted dome 2x2 with 1 knob.

Repeat the previous steps for the second eye: put the dark orange round plate 1x1 on the table, put the light purple round plate 1x1 on top, followed by the white round tile 1x1 with eye print.

Put the inverted dome 2x2 on the table, knob to the bottom, and insert the stacked 1x1 pieces.

The 2 octopus eyes are finished! Well done! Insert the top side handle pointing to the front into the hole of the dome 2x2. The tile 1x1 with eye print is pointing outwards.

Repeat symmetrically at the back. You can adjust the position of the eyes if you like.

Next, we will build the 8 tentacles of the octopus.

Since the 8 tentacles are identical, we will collect the pieces for all 8 in each step, explain the step in question for 1 tentacle and tell you to repeat it for the remaining 8.

Each tentacle consists of 3 segments: The inner segments which will be closest to the body of the octopus, the middle segments, and the outer segments. We will start with the inner segments which will eventually be mounted on the 8 balls.

Find 8 bright red plates 1x3.

Put all 8 plates upside down horizontally on the table, knobs to the bottom.

Find 24 light purple round plates 1x1.

Put 3 round plates 1x1 upside down on 1 plate 1x3.

Repeat for the 7 remaining inner tentacle segments.

These light purple round plates 1x1 are the suction cups of the tentacles!

Collect the following 16 pieces:

8 medium stone grey plates 1x2 with ball cup on short side,

and 8 maroon red plates 1x1 with vertical side clasp.

First, turn the 8 inner tentacle segments right side up again. Keep them in horizontal orientation.

Put 1 plate with ball cup horizontally on the 2 right knobs of 1 tentacle segment, ball cup to the right.

Put 1 plate with side clasp to the left of the previous piece, clasp to the left.

Repeat for the 7 remaining tentacle segments.

Find 8 maroon red roof tiles 1x3, 25°.

Put 1 horizontally on top of the 2 previous pieces, slope to the left.

Repeat for the 7 remaining tentacles.

Well done! Put those 8 inner tentacle segments aside for now. We will continue with making the middle tentacle segments.

Find 8 bright red plates 1x2 with 2 shafts on short sides.

Put all 8 plates upside down horizontally on the table, knobs to the bottom.

Find 16 light purple round plates 1x1.

Put 2 round plates 1x1 upside down on 1 plate 1x2.

Repeat for the 7 remaining middle tentacle segments.

Collect the following 16 pieces:

8 maroon red one-stepped curve tiles 1x2x⅔,

and 8 dark orange round plates 1x1.

First, flip the middle tentacle segments right side up again. Keep them in horizontal orientation.

Put 1 round plate 1x1 on the right knob of 1 tentacle segment.

Put 1 curve tile 1x2 horizontally on top of the previous piece and the knob to its left, slope to the left.

Repeat for the 7 remaining tentacle segments.

The middle tentacle segments are finished! Snap the right shaft of 1 middle tentacle segment into the clasp of 1 inner tentacle segment.

If done correctly, the two segments form a horizontal line, ball cup on the right, shaft on the left.

Repeat for the remaining 7 tentacles.

Next, we will make the 8 outer tentacle segments.

Collect the following 16 pieces:

8 bright red plates 1x2 with vertical clasp on short side,

and 8 maroon red plates 1x2.

Put the 8 plates 1x2 (the ones without clasp) upside down horizontally on the table.

Put 1 plate 1x2 with clasp upside down horizontally on top, clasp to the right.

Repeat for the 7 remaining outer tentacle segments.

Find 16 light purple round plates 1x1.

Put 2 of them upside down on 1 outer tentacle segment.

Repeat for the 7 remaining outer tentacle segments.

The outer tentacle segments are finished! Flip them right side up again, and snap their clasps on the empty shafts of the middle tentacle segments.

The 8 tentacles of the octopus are finished! Well done! Now, you can snap the ball cups of the tentacles on the balls of the octopus body.

The giant octopus is finished! Great job! You can lower the body by carefully bending the tentacles more, and lift it up by straightening the tentacles a little. The nose cone at the bottom of the octopus is there for stability.

You have finished building the entire set! Fantastic job! Let the submarine pilot roam the ocean in her high-tech vessel. She loves discovering new treasures in the deep blue sea! Who will get to the sunken treasure first? The skeleton diver or the submarine pilot? And will they be able to snatch the treasure out of the 8 octopus tentacles? It is for you to find out!

Enjoy!